
EBSILON®Professional Online Documentation


The Standard Excel Workbook
With the standard Excel Workbook you can display
view and modify by importing from
Thus you can edit specification values not only by using the graphical interface but also by using the Excel workbook interface and editing these Excel sheets.
The workbook is a Microsoft Excel document (Excel sheets). It consists of many sheets, whereby each sheets contains data of one component.
There are three supplementary sheets:
• one (named “Model“) that displays the data of the model
• one (named “Texts“) that contains texts of the text fields of the model
• one (named “Pipes“) that contains data for all pipes of the model
The sheets were created from templates by EBSILON®Professional itself when displaying and writing respectively. The templates were supplied together with EBSILON®Professional . You can either use these templates or your own ones.
The allocation of a sheet to a component is based on the "Excel Sheet name”. The "Excel Sheet name” is only generated when the component is exported into the Excel workbook for the first time. The Excel Sheet name of a component is displayed on the tab “Basic Properties“ in the component properties dialog (at the very bottom) and can be changed there too.
Changing the "Excel Sheet name” (in the properties window) becomes necessary if another sheet name is to be used in Excel. Please note that the name is NOT automatically changed in the Excel document, i.e. if a sheet for this components exists there already and the data are still needed, it will have to be renamed in Excel as well.
If you want to or have to rename, this should be done in Excel first as Excel has rather strong limitations for sheet names with regard to special characters.
The file name of the Excel workbook can be viewed and changed in the Model Options “Excel Workbook“ in the item ”Excel workbook filename”.
By default, the workbook is created in the same folder as the model file. In this case, the model name can be specified as follows:
$(ModelFolder)$(ModelName).$(DefaultExcelExt)
You also receive this setting by clicking the button “Reset Excel workbook file name“.
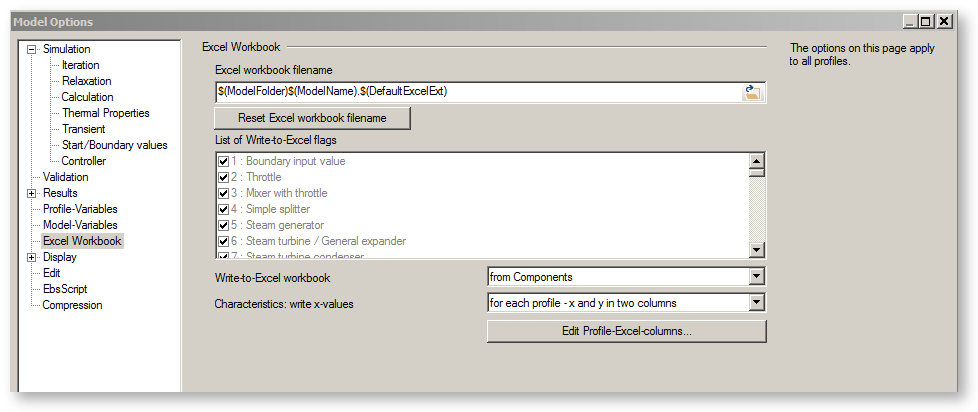
When exporting to a workbook, you can filter out the components to be considered.
When you import data from a workbook EBSILON®Professional always reads and takes over all values from all the sheets included in the workbook. This means, that all values of all sheets must be specified correctly.
If you want only some or one components data to be modified by importing, delete all the other sheets from the workbook.
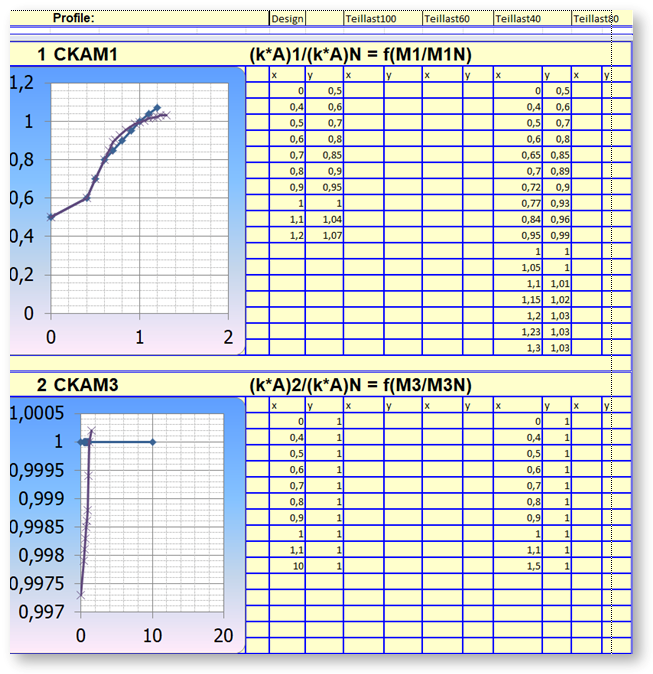
Profiles are supported by the workbook functionality.
You can report
and import
By default the Excel document (Workbook) associated with a document is stored in the same directory as your document itself. The workbook has nearly the same file name as your document, but its extension is .xls. Example: If your document is called Cycle_abc, the documents file name is Cycle_abc.ebs, the workbooks file name is Cycle_abc.xls.
You can change the workbook associated with your document by modifying the Excel-Filename. Select the ExtrasàModel Options entry from the menu bar and select the Excel tab of the Model Options window to do so.
![]()
It is strongly recommended not to run Excel on your PC, while using the workbook. There might be some bothering interferences.
Each sheet of the workbook has a name. The name is written on the tab of the sheet. The name of any component sheet is equal to the name of the component it is assigned to.
There is a template sheet for each component.
The workbook of an Ebsilon2000 document can contain a maximum of one sheet for each of your components. When you write into the workbook, sheets are inserted there.
When a sheet is inserted into the workbook,
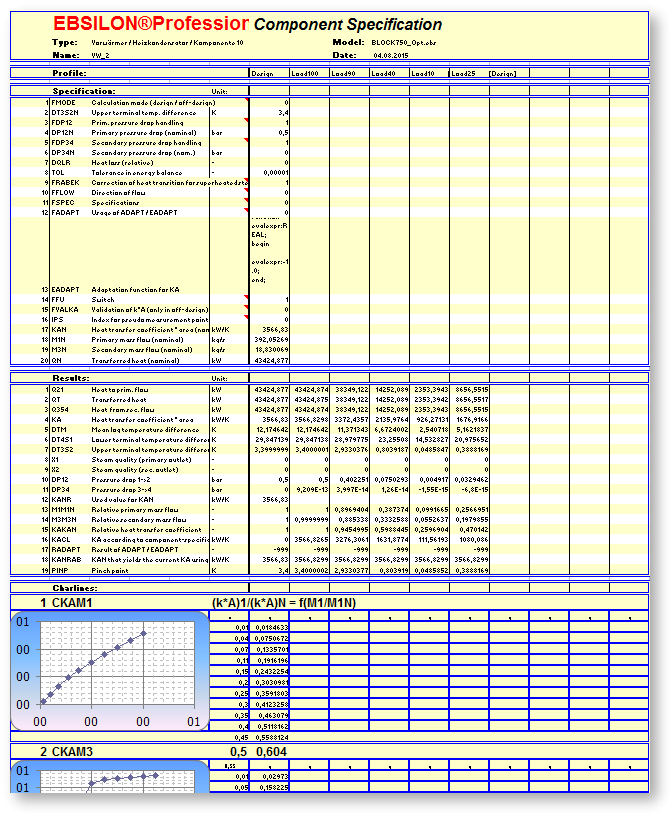
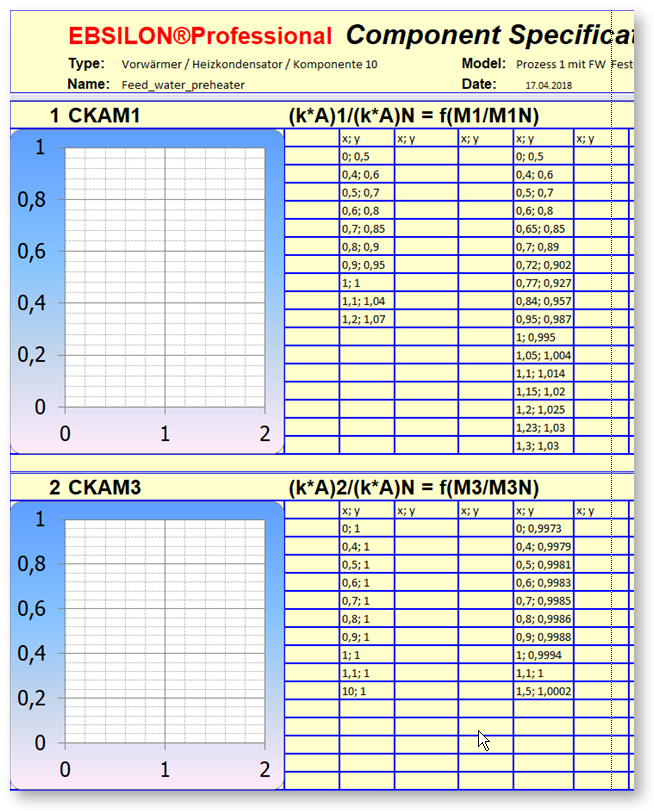
A component sheet includes
Each specification value or result line includes
For each characteristic line it includes:
The column G holds all the values of the Design profile. Each column on its right side may hold all the values of one sub profile.
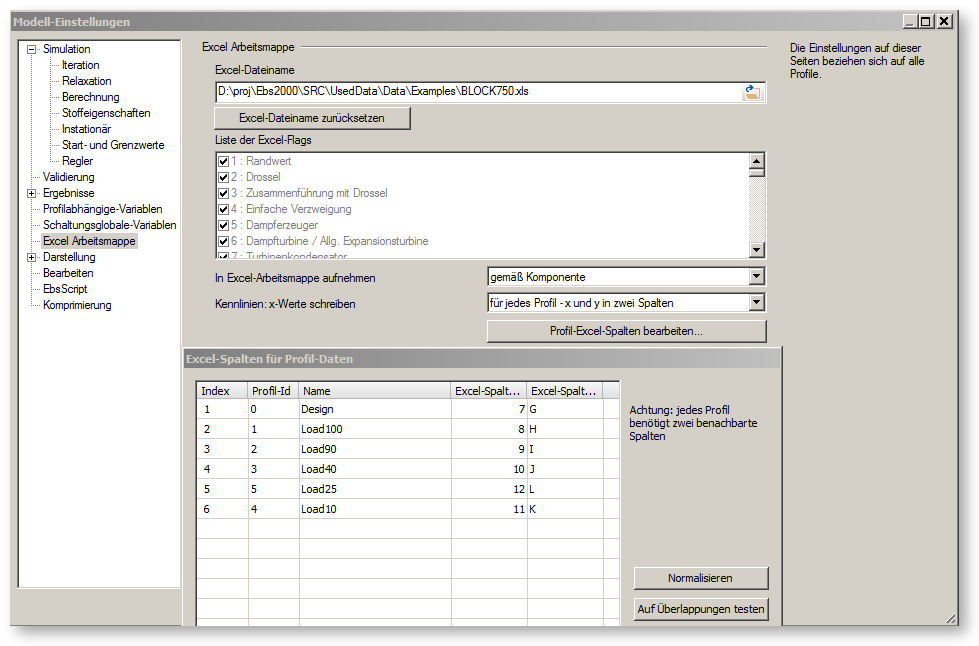
Characteristic lines can be saved in the workbook in three different ways (A) (B) (C). These differ regarding the saving of the x-values of the characteristic lines. As long as in a model the same x-values are used for all characteristic lines in all profiles, the default setting (A) can be used (“only for root profile“).
If different x-values are specified for a characteristic line in different profiles, you can choose whether for each profile
In the latter case (C) this means that the existing allocation between column and profile changes. Therefore after shifting to (C) the existing workbook should be
deleted and a new one should be created. The allocation of the profiles to the columns can be viewed and changed respectively in the Model Options "Excel Workbook"
under ”Edit Profile-Excel-columns…“.
Characteristics in workbook at default setting (A)
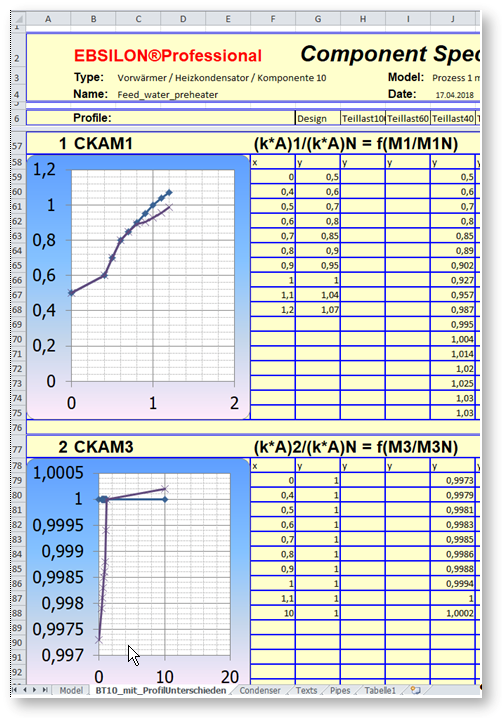
Characteristics in workbook at B) x and y values in a column
Characteristics in workbook at C) Two columns per profile (separated for x and y values)
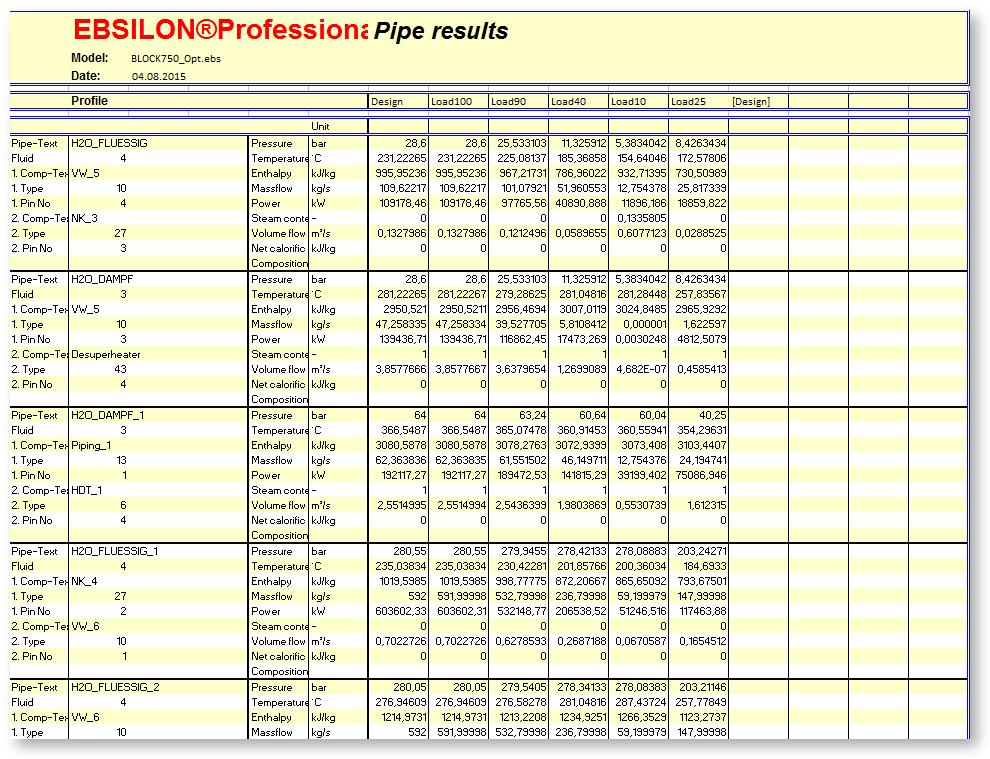
The sheet containing the pipelines data is called Pipes.
A pipeline sheet includes
These nine lines display the results and properties of a pipeline.
|
Line number |
Column 1 |
Column 2 |
Column 3 |
Column 4 |
Column 5 |
|
1 |
Explanation |
Name |
Explanation |
Unit of pressure |
Value of pressure |
|
2 |
Explanation |
Fluid Type |
Explanation |
Unit of temperature |
Value of temperature |
|
3 |
Explanation |
Name of the component it is connected to |
Explanation |
Unit of enthalpy |
Value of enthalpy |
|
4 |
Explanation |
Type of the component it is connected to |
Explanation |
Unit of mass flow |
Value of mass flow |
|
5 |
Explanation |
Number of the connector of the component it is connected to |
Explanation |
Unit of energy flow |
Value of energy flow |
|
6 |
Explanation |
Name of the other component it is connected to |
Explanation |
- |
Steam percentage |
|
7 |
Explanation |
Type of the other component it is connected to |
Explanation |
Unit of volume flow |
Value of volume flow |
|
8 |
Explanation |
Number of the connector of the other component it is connected to |
Explanation |
Unit of calorific value |
Value of calorific value |
|
9 |
|
|
Explanation |
|
Fluid Composition |
The values of column G are those of the Design profile.
Each column on its right side may hold all the values of one sub profile.
Lines 17, 26 and so on include the composition of the fluid. Its contents extends over several columns. This does not matter, because it is independent of profiles.
The sheet containing the calculation parameters for the model is called Model.
The sheet containing the text fields is called Texts.
This sheet offers a convenient way to edit text fields. This example contains the text of the Plant Economy block in block750.ebs. To create such a sheet,
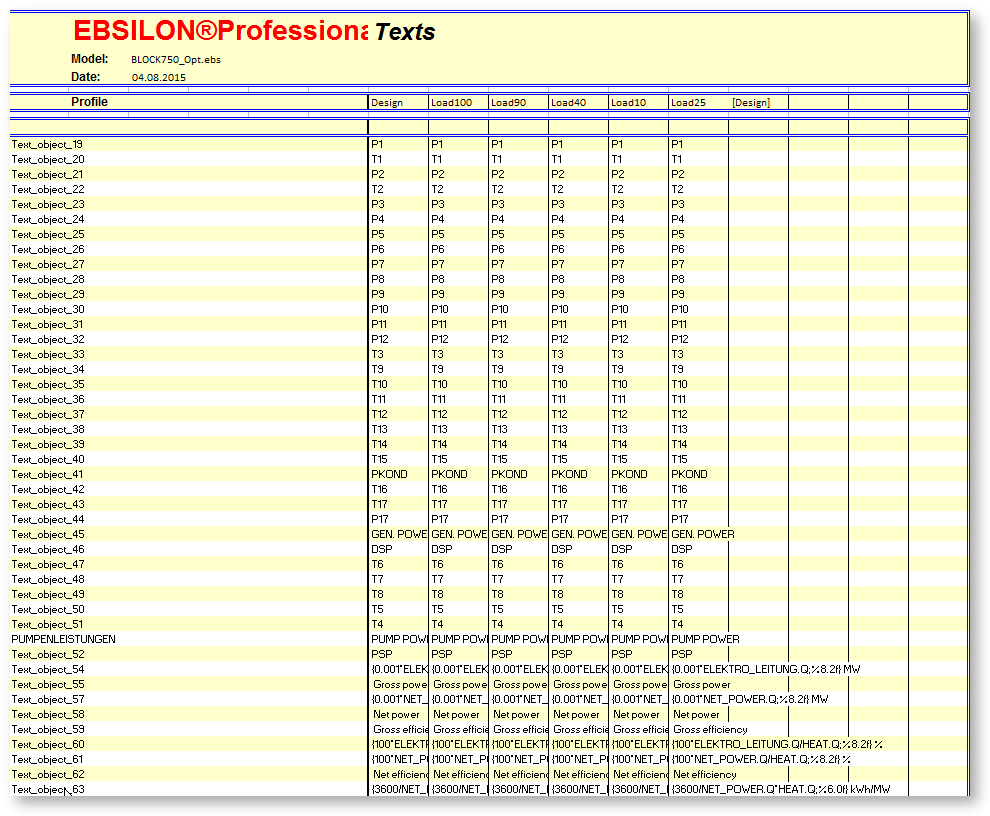
If you have a text field that does not depend on profiles, it will be written to each profile column in case of export to Excel.
When you read such a text field from Excel, EBSILON®Professionalwill take care of profile-specific texts. The flag Text depends on Profile for the text field will be changed automatically.
The unit specified in the workbook with each specification value will be considered in importing only.
If you specify the unit psia in the workbook with a pressure specification value, it will be considered to be psia on importing (e.g. 5 psia will be considered to be 0.344738 bar).
On exporting the units in the workbook will be superseded by those specified in the document.
Select one of the entries from the submenu of the DataàStandard ExcelàOpen workbook entry of the menu bar.
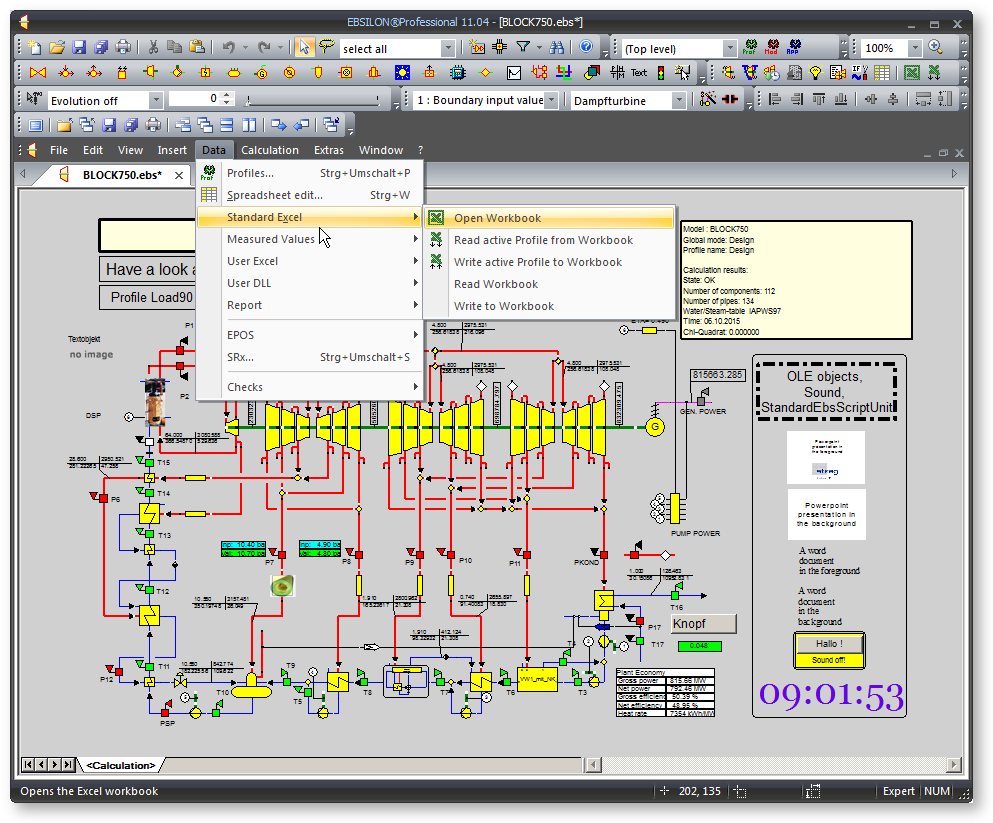
Open Workbook opens the workbook associated with your document and displays it in an Excel window on the screen, as if you would have opened the workbook by Excel.
Read active Profile from Workbook tries to import all data (values of specification values) from the workbook into the active profile of your document. All values of the active of your document will be replaced.
Write active Profile to Workbook exports all data (values of specification values) of the active profile from your document into the workbook.
Read Workbook tries to import all data of all profiles (values of specification values) from the workbook into the corresponding profiles of your document. All values of your document will be replaced.
Write to Workbook exports all data (values of specification values) of all profiles from your document into the workbook.
Or click on of the buttons from the EBSILON bar, which are marked with a green X:
The column G of every Excel sheet holds the values of the root profile of the profile tree. This profile is named Design by default. Each columns right of it (from H upwards) may hold data of one sub profile.
On exporting data the name and the number (identifier) of one or all profiles are written to the Excel sheet. Each name is followed by a list of profile names in square brackets, which indicates its parent profiles at the moment of exporting.
Because
you cannot use the profiles names to assign one column of a sheet to a sub profile of the document when reading from a workbook.
That is why profile names are not used to assign the data of a column to a sub profile of profile tree This is done via the identifier of a sub profile, which is a positive integer number. This number is displayed within the profile tree and in row 6 of the Excel sheet.
|
Identifier |
Excel sheet column |
|
0 |
G |
|
1 |
H |
|
2 |
I |
|
3 |
J |
|
4, 5, 6, & |
K, L, M, & |
After having written the workbook, you can edit it within Excel, to modify some data. Afterwards you may want to read the workbook, to import the modifications inside your document.
On importing data
Before importing data from an Excel sheets for one or all sub profiles, be sure, that the assignment as described above meets your requirements. Normally this will match. But be careful, if the profile tree of the document was modified since the workbook you took for the basis of your Excel editing was written.