
To use the access to the SRx data server within EBSILON®Professional, you have to specify which objects in EBSILON®Professional are related to which data points in the SRx data server and in which SRx archives they are available. See also: Edit components
This entry can be specified either for each single EBSILON®Professional object (e.g. at the respective measurement point) or globally in the overview table.
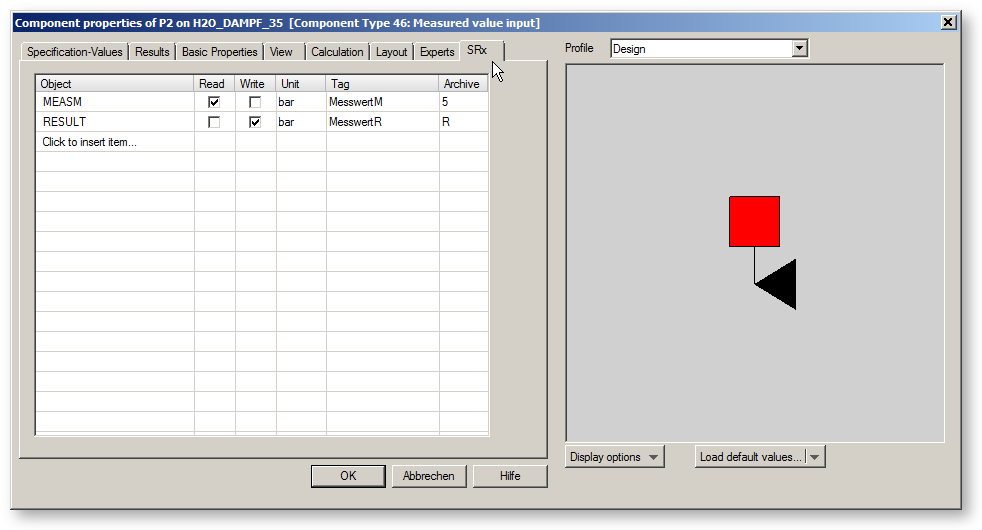
For each component and pipe there is a sheet Data-Bindings ("SRx") in the property window (which is displayed after a double click on the component or pipe).

This sheet allows to define a connection of specification or result values of the selected component or pipe to a SRx data point. When you click into the field "Click to insert item..." in the column "Object", you get a combo box with the names of all specification and result values that are available for the corresponding component or pipe. There you select one entry.
By activating the check boxes in the columns "Read" or "Write" you define whether the corresponding value shall be read (i.e. transferred from SRx to EBSILON®Professional) or written (i.e. transferred from EBSILON®Professional to SRx). You also may activate both check boxes. The corresponding point will be read and written in this case.
The column "Tag" is used for the name that is used in the SRx data server for the corresponding data point.
The column "Archive" is used for the name (identification letter) of the SRx archive, where the corresponding SRx data point is stored in the SRx data server. If a data point is stored in more than one archive, you have to specify the archive with the smallest time interval for writing. For reading, you may specify the archive that shall be used by default for reading by EBSILON®Professional.
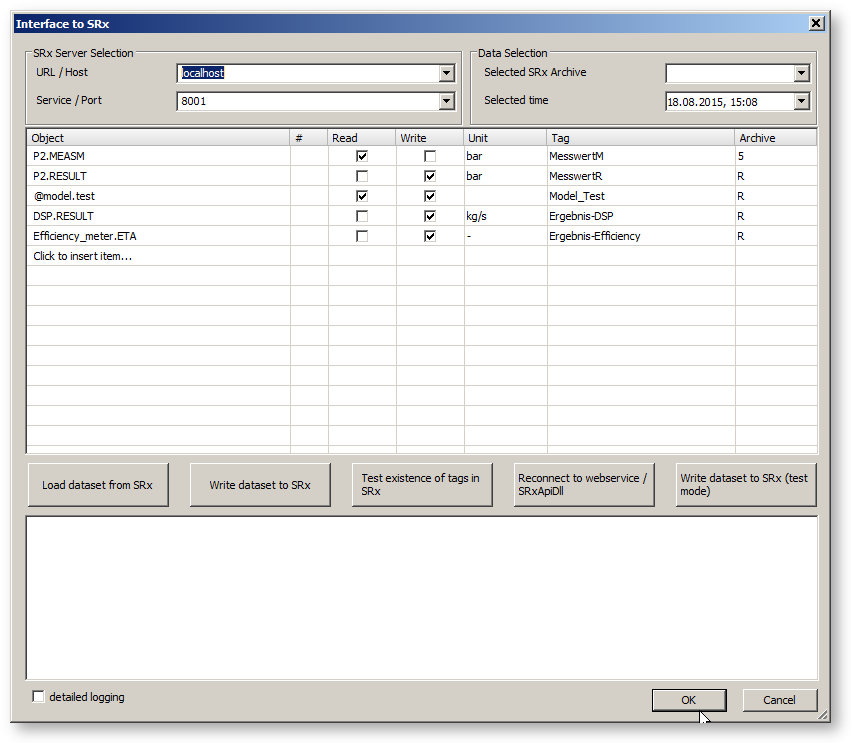
To get an overview about all SRx configuration data that are available in the model, you can use the menu command "Data"à "SRx".

In this dialog, there is a table collecting all entries that were inserted on the "SRx" sheets for the single components and pipes. In return, entries inserted in this table will be displayed also on the SRx sheets of the single components and pipes.
EBSILON®Professional model variables can be added to the SRx configuration in this dialog only. Even for model variables that are defined as arrays in EBSILON®Professional, it is possible to insert them to the configuration. For this purpose, the column "#" can be used to specify the index of the array element that shall be used.
To insert new entries, you have to click on "Click to insert item...". In the selection box, you get a list of all components and pipes in the model with their corresponding attributes.
The other columns have the same meaning as on the property sheet for single objects.
Alternatively, it is possible to read and edit configuration data by EbsScript. For this purpose, the EbsScript functions getSRxInfo and setSRxInfo are available.
In the range "SRx server selection" you have to insert the computer name of the SRx server and the port number.
The fields in the range "Data selection" are required when you want to read or write data. For this purpose, use the buttons "Load dataset from SRx" and "Write Dataset to SRx".
The button "Load configuration from SRx" calls configuration data from SRx and compares them with the entries for the SRx tags within EBSILON®Professional. If there is a mismatch, an error message is displayed.
The button "Send configuration to SRx" is not active at the moment.
From EBSILON-Version 7 a button is available in the SRx dialog that restores connection to SRx.
Test mode when writing
As when writing, all data are transferred to SRx in one call and SRx only returns an overall error code, it was very tedious to find a faulty entry. It is possible to write in test mode. Then, each data point is transferred individually to SRx. In the event of an error, the tag of the data point for which the error occurs will then be displayed.