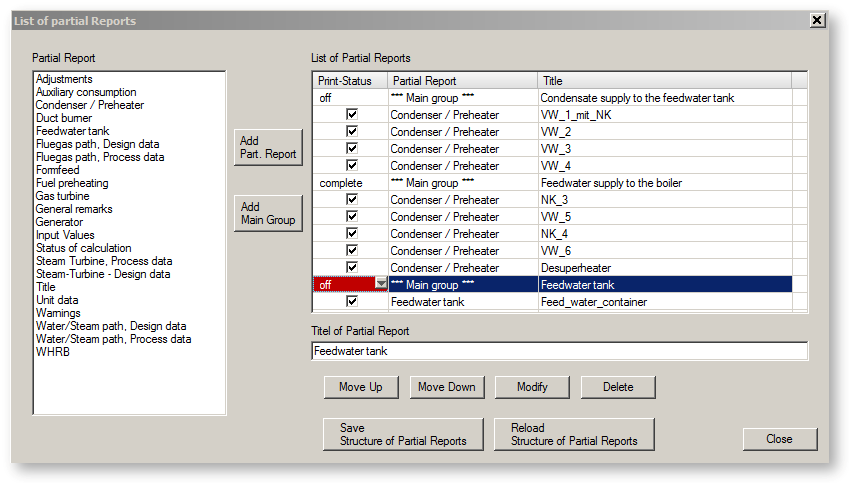

You can modify the list of the sub-reports with the help of this function.
Each row of the list first contains an entry for the report type. Thereafter, the title of the sub-report is printed, if available.

The list on the left shows all the possible sub-reports.
The list on the right shows all the sub-reports, which are to be printed in the report of this model. The sequence in the list corresponds exactly to the sequence in the output in the file.
The buttons have the following meaning:
|
Insert |
The sub-reports selected by a mouse click in the left list are inserted in the list of the sub-reports. |
|
Insert main group |
A new main group is added to the list of the sub-reports. |
|
Up |
The sub-reports selected by a mouse click or the entire main group is moved up in the list by one place. |
|
Down |
The sub-reports selected by a mouse click or the entire main group is moved down in the list by one place. |
|
Modify |
The selected sub-report can be edited further in a separate dialog box. |
|
Delete |
The sub-reports selected by a mouse click or the selected main group is deleted. |
|
Save Structure of the Sub-reports |
The current generated structure of the main groups as well as their sub-reports are saved in a separate file. |
|
Load Structure of the Sub-reports |
A pre-defined structure from the main groups and sub-reports is loaded. |
|
Close |
The screen is closed. |
There are two ways of inserting a new sub-report in the current list of the sub-reports:
If no entry is selected in the list on the right before inserting the sub-report, then the new sub-report is appended at the end of the list.
If an entry is selected in the list on the right before inserting the sub-report, then the new sub-report is inserted directly after the selected entry.
A new main group is created in the list of the sub-reports by clicking on the button Insert main group.
If no entry is selected in the list on the right before inserting the main group, then the new main group is appended at the end of the list.
If an entry is selected in the list on the right before inserting the main group, then the new main group is inserted directly after the selected entry.
The sequence of the sub-reports in the list matches the sequence in the output of the complete report in the file. If you want to change the sequence, you only need to select the sub-report to be moved with the left mouse button. The selected row is then displayed in colour.
With the help of the buttons Up and Down you can move the selected sub-report:
|
Up |
The sub-report or the main group with all its related sub-reports is moved one place up in the list i.e. in the report the sub-report is moved upward. |
|
Down |
The sub-report or the main group with all its related sub-reports is moved one place down in the list i.e. in the report the sub-report is moved downward. |
A sub-report can also be moved beyond the boundaries of a main group. However, no sub-report can be moved from the first main group.
You can modify a sub-report in a separate screen. To do this, you must:
Further details for this are given in the chapter on Edit Sub-Report.
After you have selected a sub-report or a main group in the list on the right, you can either enter a title in the field Title or else modify an existing title.
After you have selected a sub-report, you can delete it from the list by clicking on the button Delete.
You can also delete a main group, if it no longer contains sub-reports.
You can save any report structure as a file, which you can use as a template in other models.
This file contains all the main groups and the sub-reports as well as their titles, print states and the sequences.
Caution:
No components are stored together with the sub-reports!!
Here you can load a pre-defined report structure as a template for creating a report for your model.
Upon loading, your current settings will be overwritten.
Caution:
After you load a pre-defined report structure, you must reassign the components needed for the sub-reports, because the pre-defined structure does not contain any components.