
EBSILON®Professional Online Documentation


You can create reports that contain specification values by exporting data to Microsoft Excel.
You can report these values simultaneously for one or more profiles.
While in the ”Standard Excel” interface the output data must be positioned at fixed positions in the Excel sheet, in the ”User-defined Layout Excel” interface the user can himself define the arrangement of the data within the Excel sheet.
This is especially useful, when the output data from another program have to be reused, and you want to prevent a conversion of the data within your Excel sheet through copying and pasting.
The assignment of positions in the Excel-sheet to the variables in the EBSILON cycle is achieved in general, when one uses the Excel ”Defined Names” functionality (within the scope of the EBSILON Performance Optimization System (E-POS) it is possible to use the formatting commands selectively in the first row of the Excel-sheet).
There are two types of Excel reports, which you can create with this interface:
Use type ”A”, when you want to create a report, which compares the different profiles. The profiles are arranged in the columns of your Excel-sheet. In the rows the required specifications or the result values are reported. The layout is identical to the layout necessary for the import.
Use type ”B”, when you want to create a report, which compares the component properties, especially the component lists. There is a row for each component. The desired attributes for the components are listed in the columns. This report includes only the active profile. This layout cannot be used for import.
In order to prepare for the creation of this report, you must
This sheet is used as a template for your report.
While reading the template, EBSILON®Professional identifies these Excel-defined names and tries to insert the specification values from the document in the sheet by following certain rules.
These rules describe
A sample Excel-sheet is shipped along with EBSILON®Professional .
To export data in an Excel document, select the option ”Data --> User Excel --> Report” from the Menu bar.
The window ”Reported values to Excel File” is shown.

Select the Excel template, which you have created for reporting and click “Open”.
Excel now starts in the background and the Excel template is opened.
The defined names of this sheet are read, and the data is sent to the sheet, under consideration of the rules for reporting the Excel data.
You must always specify a unit along with each specification unit. If this unit is different from the one specified in the document, the value is then converted in the unit that has been specified within the Excel-sheet.
After the report has been created, Excel becomes visible and shows you the report. You are now asked to specify a directory and a file name, in which the report is to be saved. It is assumed that you do not want to overwrite your template.
After you have saved the report, Excel is closed and you can continue to work with EBSILON or open the report again within Excel.
Do not get worried, if you get error messages about a busy server:
This can happen, when EBSILON waits for a response from Excel, while Excel is busy waiting for a confirmation from you. To continue, simply click “Repeat”.
In order to be processed correctly by EBSILON®Professional, you should organize your Excel-sheet keeping in mind the following rules:
The Excel-sheets must always have defined names for rows, columns, or cells. These names specify the data to be reported.
If your Excel template file contains more than one sheet, EBSILON then tries to use all the sheets. You must pay attention that the corresponding names for the all the sheets are defined. Note that within Excel, names can be defined locally for a specific sheet or globally for the entire spreadsheet. EBSILON recognizes both the name types.
If you assign names to individual cells instead of complete rows (or columns), EBSILON uses the corresponding row (or column), in which the cell is present.
In both the report types, you can use the names
for specifying a cell, in which the file name or the current date is to be entered.
A row of an Excel-sheet of this type can describe the data of a specific specification value (values and units) of a certain component or pipe.
The defined name of this row must
Example: ”S_Input_von_Wert_8.NCV ” specifies a row, which is meant for reporting data to the specification value identified by ”NCV” of the component or of the pipe, known as ”Input_von_Wert_8”.
A column of an Excel-sheet of this type can report the data of a specific profile. The defined name of this column must
Example: ”P_Variation_C” specifies a column, which is supposed to report data to the profile known as “Variation_C”.
A column of an Excel-sheet of this type report data, which describe the unit of the specification value. The defined name of this column must be ”X_UNIT”.
Example:
A part of an Excel-sheet now follows. It reports the specification values of
The identifiers for the specification values to be reported are ”P”, ”T” and ”Q” respectively.
They report these specification values to six profiles, known as ”Variation_A” , ”Variation_B” , ”Variation_C” , ”Variation_D” , ”Variation_E” , ”Variation_F”.
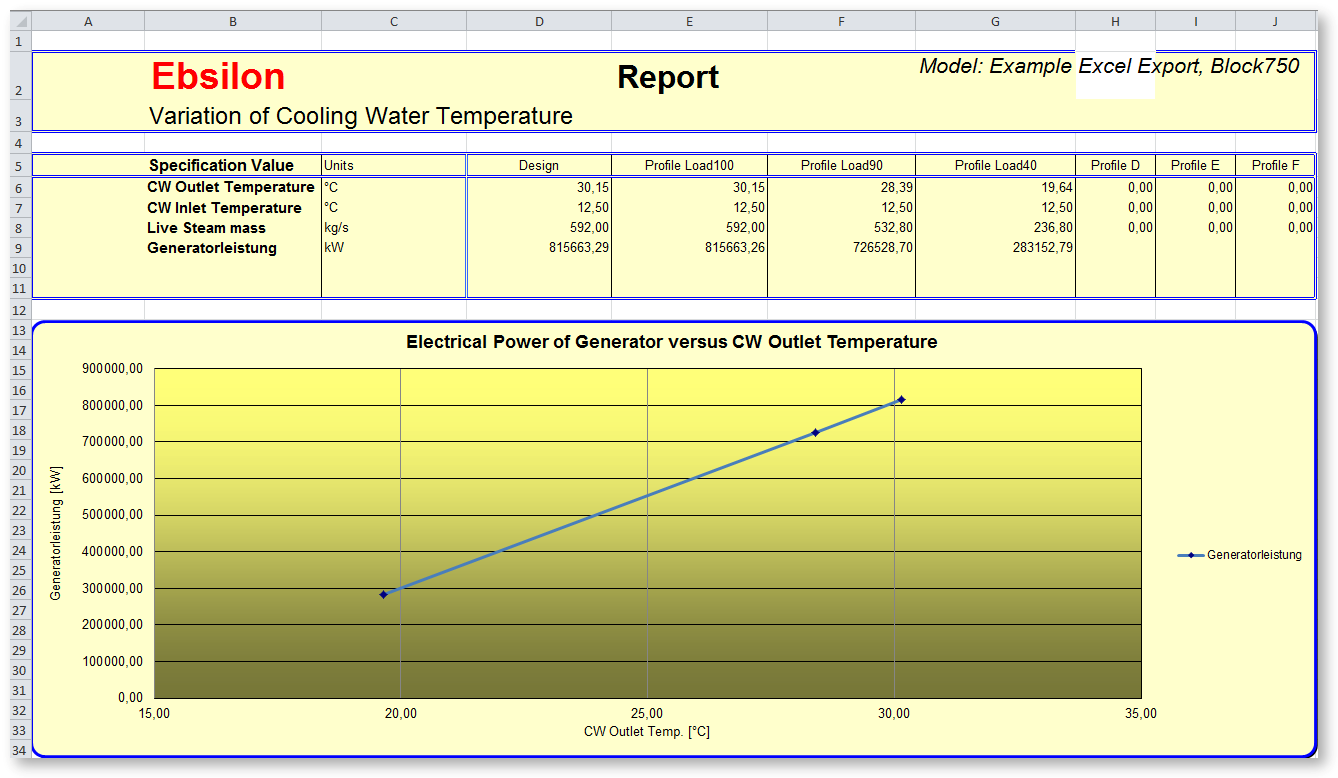
Rows 6 to 9 and columns C to I must be named. If you have followed the rules given above, the defined names must then be as follows:
|
Row / Column |
Defined Name |
|
6 |
S_cooling water inlet pipe.T |
|
7 |
S_cooling water inlet.T |
|
8 |
S_cooling water inlet pipe.P |
|
9 |
S_Generator outlet.Q |
|
C |
X_UNIT |
|
D |
P_Variation_A |
|
E |
P_Variation_B |
|
F |
P_Variation_C |
|
G |
P_Variation_D |
|
H |
P_Variation_E |
|
I |
P_Variation_F |
In this way, the list of defined names is displayed by Excel.
Cells C6 to I9 must be formatted as ”Numeric”.
Cells C6, C7, C8, C9 must be formatted as ”Text” or ”Standard” and must contain strings of units.
The data reported to an Excel-sheet of this type are taken from the active profile.
A row of an Excel-sheet of this type must contain a table heading. Your defined name specifies a subset of components or pipes. Each row below this contains data for an element (component or pipe) of this subset.
The subset can be specified through
A column of an Excel sheet of this type can contain data for a specific property of all elements of this subset. Your defined name specifies this property. This can be:
For each component or pipe of the subset, the value of this property is reported backwards from the column below the named row.
Examples of defined names:
Example
Given below is a section of an Excel-sheet. Here, the specification values of all components known as ”Steam…” are reported.
The following specification values of this component are reported:
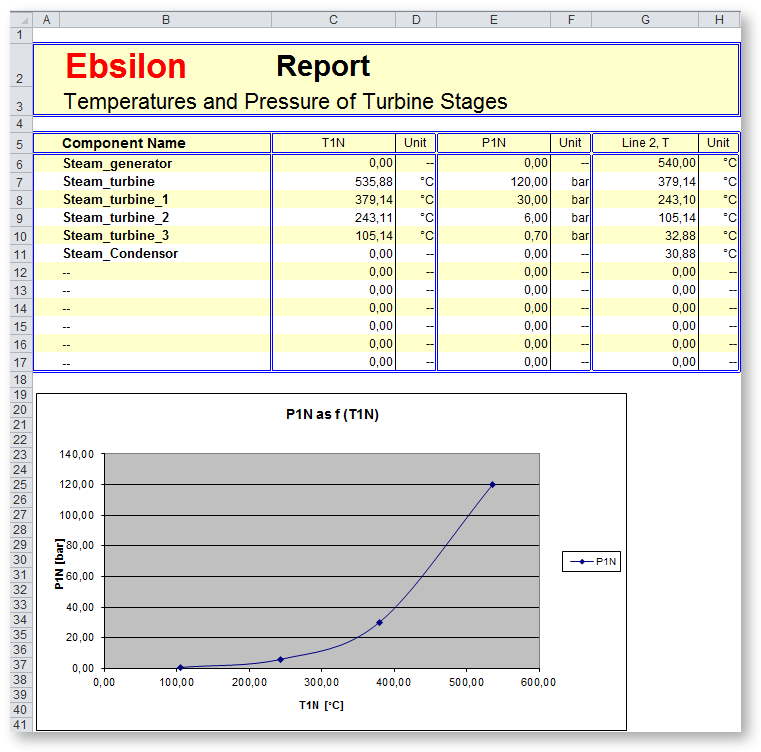
Row 5 and columns B to H must be named. When the rules mentioned above are followed, the defined names must then be as follows:
|
Row / Column |
Defined Name |
|
5 |
C_Steam |
|
B |
N_NAME |
|
C |
V_T1N |
|
F |
U_T1N |
|
E |
V_P1NSET |
|
F |
U_P1NSET |
|
G |
L_2.V_T |
|
H |
L_2.U_T |
The list of defined names is displayed by Excel as shown below.
Cells B6 to H17 must be formatted as ”Numeric” or ”Text”, in order to store the values or the units.
If EBSILON®Professional cannot award
which it has taken from the list of the Excel Defined Names, you get an error message, and the corresponding data is not imported.
(This option is not available in the standard EBSILON®Professional license).
The use of Excel Defined Names offers high flexibility for the layout of an Excel sheet. In certain cases, one does not need such a flexibility, but wants to transfer a large quantity of data directly from EBSILON to Excel, without doing a lot of preparation, such as naming the rows and columns, beforehand.
For this reason, you can simply insert a row with formatting commands at the start of an Excel sheet.
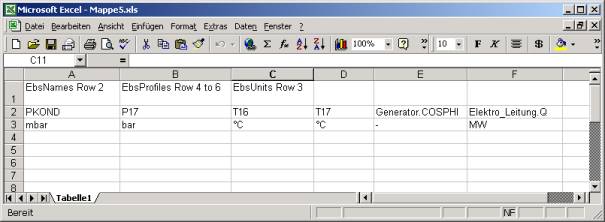
There are three commands, which must be provided in the specific cells:
In cell A1 the command ”EbsNames Col I” or ”EbsNames Row I” must be inserted, where / is the column name or the row number of the column/row, which contains the names of the specification values. For measured values (component 46) the specification ”.RESULT” can be omitted.
In cell A2 the command ”EbsProfiles Col I to J” or ”EbsProfiles Row I to J” must be inserted there, where I and J are the names of the first and the last column / row, which are meant for containing the data of EBSILON. For simplifying, the data is written as a profile one by one, regardless of the profile hierarchy or the profile name. If you want to have the data of specific profiles in specific columns / rows, you cannot use this simplified interface.
In cell A3 the command ”EbsUnits Col I” or ”EbsUnits Row I” must be inserted there, where I is the column name or the row number of the column / row, which contains the units for the specification values. These units should be different from the ones used in the cycle.
After you have created such a template and selected ”DataàUser ExcelàReport”, your report is created:
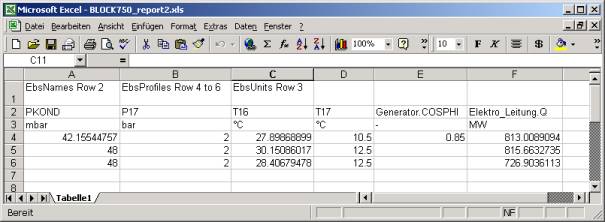
Note that there are blank cells, if a value is not defined in a profile, but instead is inherited from the parent profile.
This interface does not support the report of the profile name. However, it is possible to display the profile name using the following trick:
Add a macro object to the cycle that has a specification value of type "TEXT". For this value, insert the expression {getCalcProfilName} and add this value to list of output values.